
This is a step-by-step quick guide on how to deploy a Python Flask app on the DirectAdmin panel. This is the shortest guide; the deployment takes less than 5 minutes if you are experienced, and about 10 minutes for a beginner. So, let’s head towards our deployment steps.
Step 1:
Log in to your DirectAdmin panel and using the search bar, search for “Python Setup”. Now click on that, and you will see this interface on your screen.
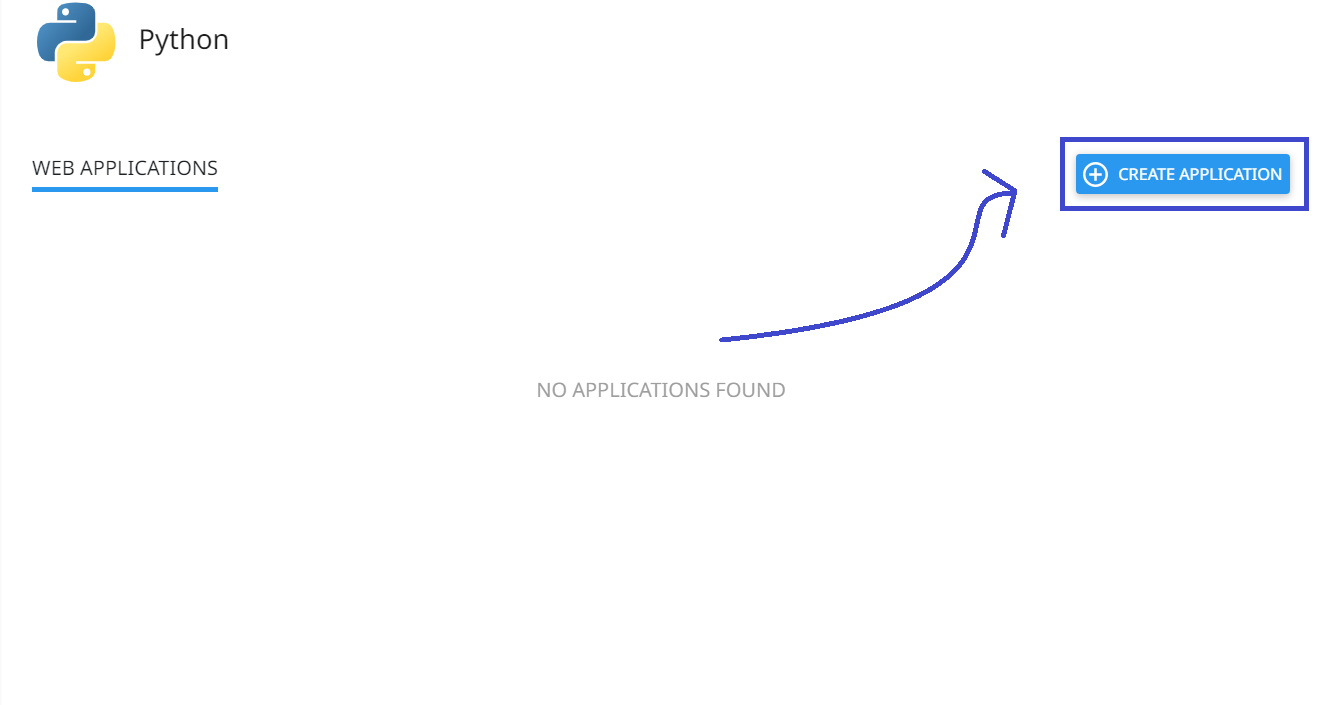
As shown in the image, click on the “Create Application” button. After that, you will see the interface below. This interface might make the setup seem difficult, but it’s as easy as hosting an HTML file on the server. Now, follow the instructions carefully in the following steps.
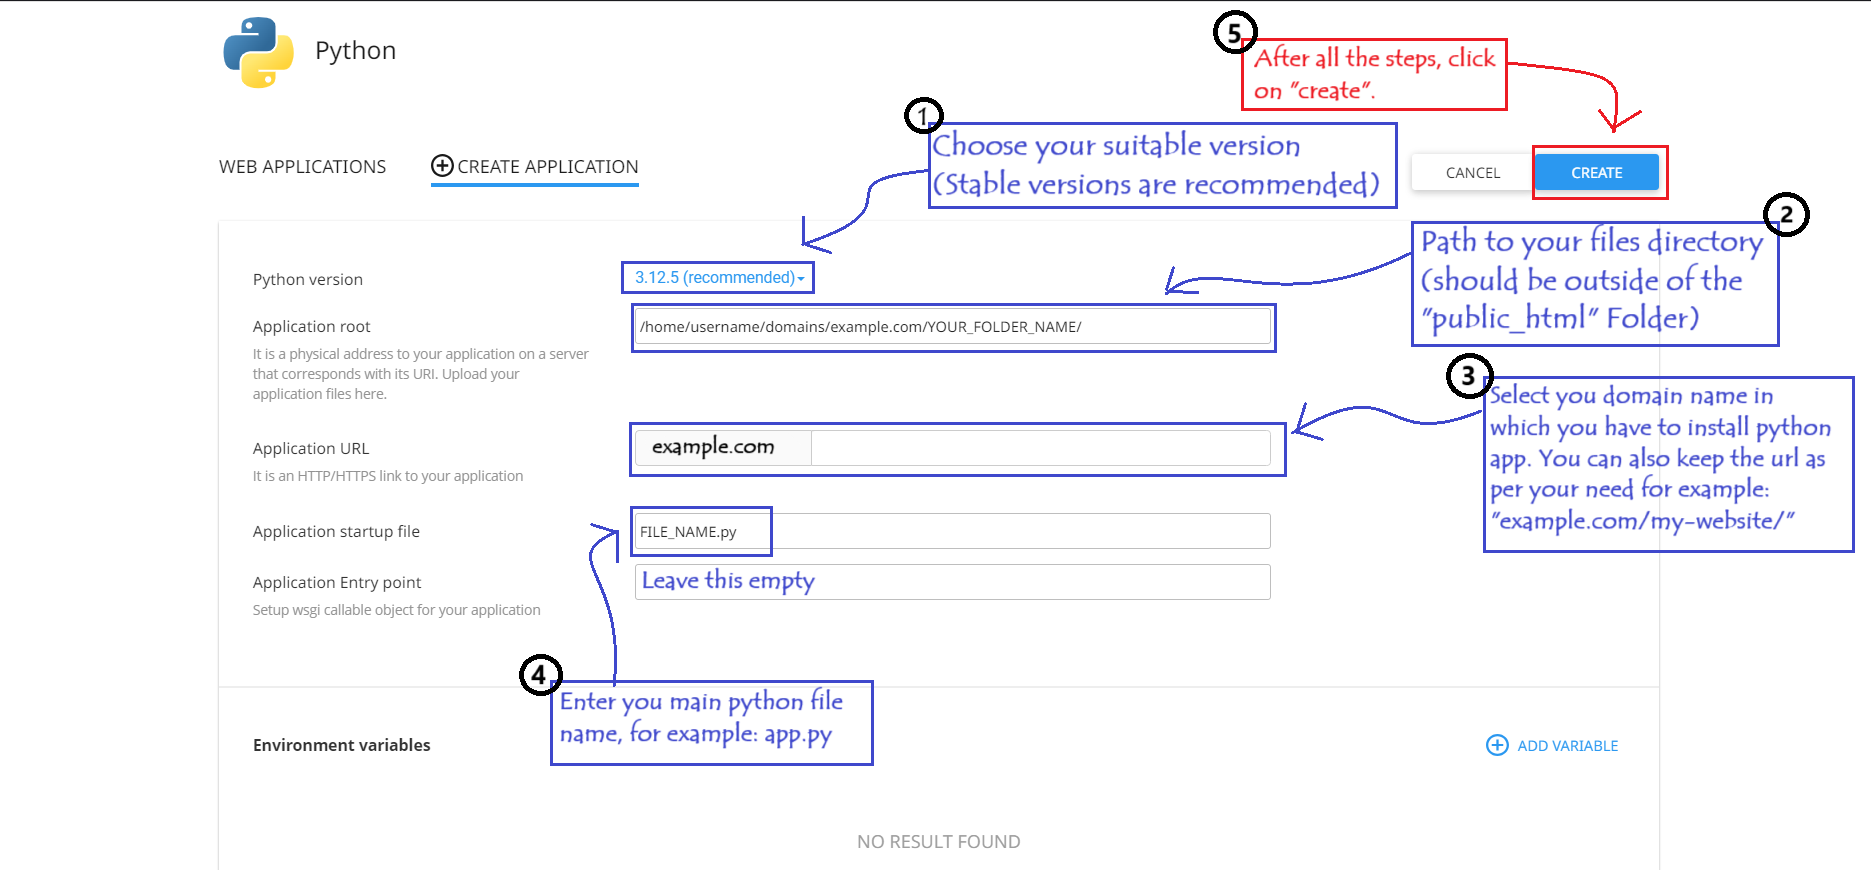
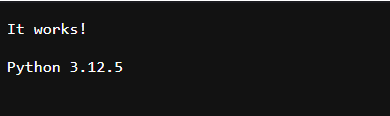
Now, after completing the steps as shown and clicking on the “Create” button, your app will be created, and you will see the following message on your website URL: “It Works! and Your (Selected python version)”.
However, remember, if you provide incorrect details, such as the wrong path or file name, your app will not be created, and you will encounter errors. So, make sure to enter the correct filename and path. Now, let’s move on to the next step.
Step 2:
Now we need to install our required modules and also replace the “file_name.py” code with our main Python code. So, let’s see how to do it.
The first important step is to install all the required modules. To do that, create a file named “requirements.txt” inside your Python app folder and enter the names of your required modules in this format as shown.
Requirements.txt’s Format Example:
					Flask==2.3.3
SQLAlchemy==2.0.20
Pillow==9.4.0
pandas==2.1.1
requests==2.31.0
gunicorn==21.2.0
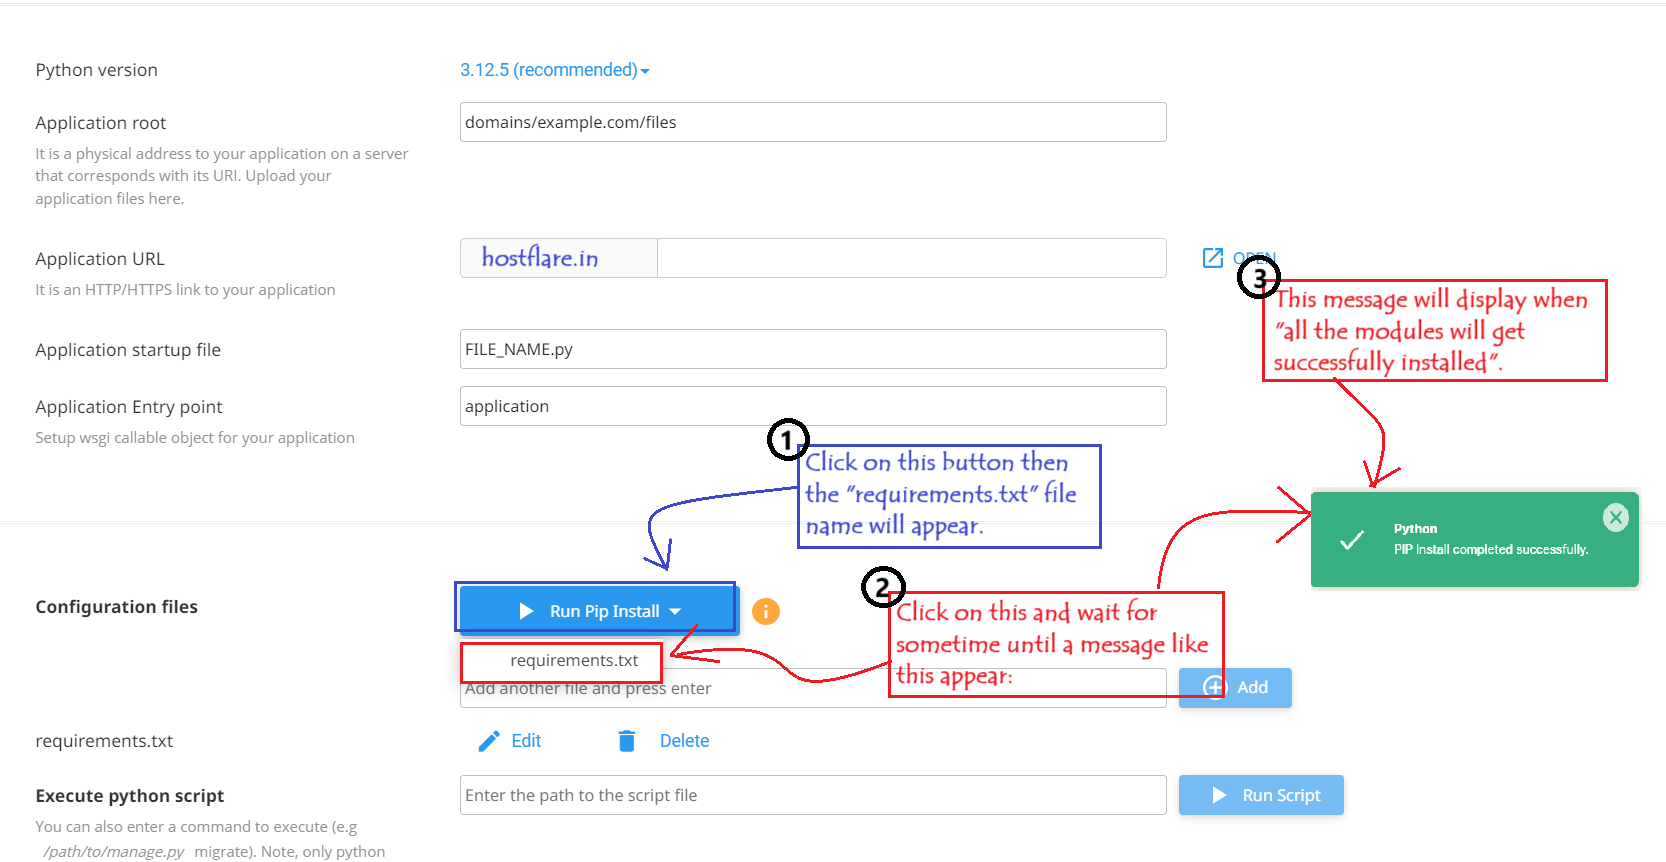
Now, after creating the “requirements.txt” file and entering the modules you want to install with the desired versions, navigate to this page as “shown in the image below” and add the requirements.txt file name in the input field located below the “Configure Files” section. Then, click on the “Add” button.
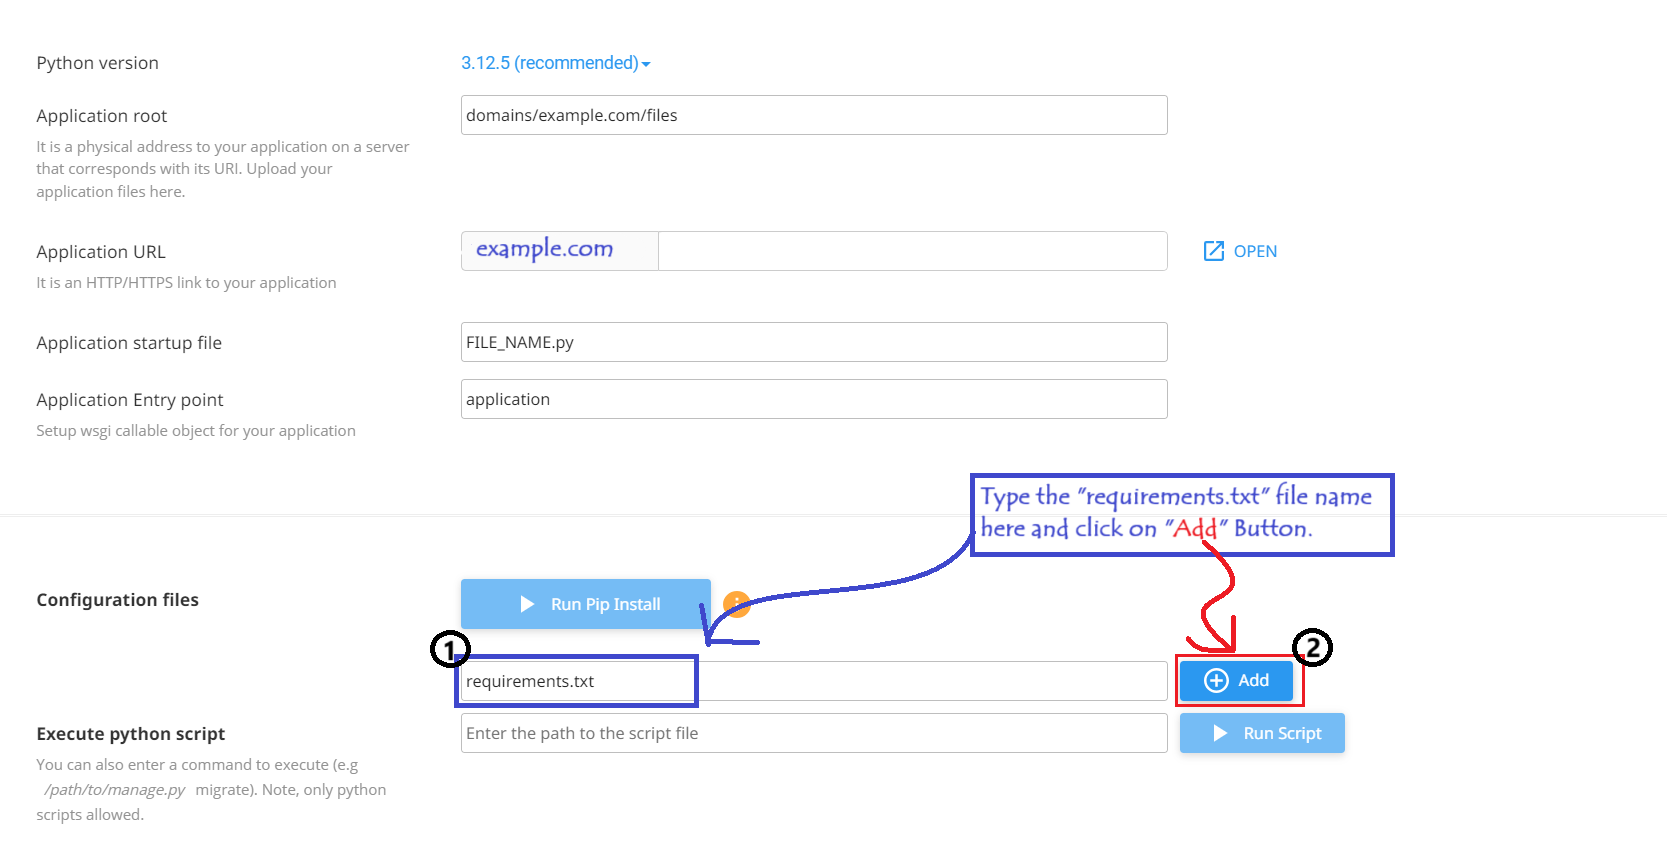
After adding the “requirements.txt”file, the “pip install” process will be activated. By using pip install, you can install the modules listed inside the “requirements.txt” file. Let’s see how to run pip; it’s very easy.
After all the modules have been installed, the last step is to set up “passenger_wsgi.py”. This file will import our main Python script, allowing our Python app to be displayed in the browser. Let’s see how to do that in simple steps.
During the installation, a file named “passenger_wsgi.py: will be automatically created in the directory you specified during the setup. Go to the “passenger_wsgi.py“ file and click on Edit. The default content of “passenger_wsgi.py” will look the same for everyone.
Passenger.wsgi Default Content:
					import os
import sys

sys.path.insert(0, os.path.dirname(__file__))

def application(environ, start_response):
    start_response('200 OK', [('Content-Type', 'text/plain')])
    message = 'It works!\n'
    version = 'Python %s\n' % sys.version.split()[0]
    response = '\n'.join([message, version])
    return [response.encode()]
Change this default content to the provided code below, and make sure to edit the code according to the name of your main Python file. Let’s see this step in more detail.
Replace default passenger.wsgi code with this code:
					import sys
import os

# Add the path to your project directory to the Python path
sys.path.insert(0, os.path.dirname(__file__))

# Import your Flask app from the root level
from [YOUR_FILE_NAME] import app as application
Change “[YOUR_FILE_NAME]” with your actual main Python file name, and then save the file. Finally, after all these overwrite your Main Python file code or re-upload your main Python file.
Now, head over to your website URL and check, your Python Flask app is ready to serve and accessible to everyone!
Hope this guide helps you successfully deploy your Python Flask app! However, if you face any issues while deployment, feel free to reach out to us—we’re here to serve you 24/7. If you are a “HostFlare Hosting User” don’t worry!, We can set up your Flask app for free. Just reach out to us via live chat, email, or ticket, and get your app deployed for free! Please like and share this post if you found it helpful. We appreciate the time you took to read this.Thank you, and Happy Coding 🙂


Thank you for the information.